- Published on
- · July 10, 2026
How to integrate MongoDB with Next.js: step by step
- Blog

- Henrico Piubello
- Henrico Piubello
- IT Specialist - Grupo Voitto
IT Specialist - Grupo Voitto
To integrate MongoDB with Next.js, use the official with-mongodb example: run npx create-next-app --example with-mongodb, set the MONGODB_URI variable with your MongoDB Atlas connection string, and query the data through API routes. This guide covers everything, from zero to deploy on Vercel.
- What you need to integrate Next.js and MongoDB
- What is Next.js?
- What is MongoDB?
- How to create a Next.js project with MongoDB?
- How to connect MongoDB to Next.js?
- How to query MongoDB data in Next.js?
- Practical example: Next.js API endpoint with MongoDB
- Sending the Next.js project to GitHub
- How to deploy the project on Vercel?
- Next.js and MongoDB with one click
🗒️ Note: This tutorial uses the Next.js Pages Router instead of the App Router, introduced in Next.js 13. The Pages Router remains compatible and recommended for production environments.
What you need to integrate Next.js and MongoDB
To follow this tutorial, you need four things: a MongoDB Atlas account, a Vercel account, Node.js 18 or higher, and the npm package manager (with npx). All have free tiers, so you can complete the integration without spending anything.
- MongoDB Atlas (free sign-up)
- Vercel account (free sign-up)
- Node.js 18+
- npm and npx
To get the most out of the content, it is recommended to be familiar with React and Next.js. Even so, we cover the exclusive features with enough detail that beginners can also get value from this guide here at CodeCrush.
What is Next.js?
Next.js is a framework based on React for building modern web applications. It adds powerful features like server-side rendering (SSR), automatic code splitting, and incremental static regeneration, which makes it easy to create scalable, production-ready applications.
These features make Next.js a natural choice for those who want to combine frontend and backend in a single Node.js project, without maintaining two separate servers.
What is MongoDB?
MongoDB is a NoSQL (Not Only SQL) database management system used to build modern, scalable applications. Unlike relational databases, it adopts a flexible data model based on JSON (JavaScript Object Notation) documents, which makes it easy to store and manipulate semi-structured and unstructured data.
MongoDB offers high availability, horizontal scalability, and support for powerful queries, which makes it popular in scenarios ranging from web applications to Big Data analytics. According to the Stack Overflow Developer Survey 2024, MongoDB is used by 24.8% of developers, making it the most popular NoSQL database — behind only relational options like MySQL and PostgreSQL, the latter leading with 48.7%.
How to create a Next.js project with MongoDB?
Next.js maintains an extensive library of examples that show how to integrate the framework with different features, such as GraphQL servers, authentication libraries, and CSS frameworks. The example we will use is called with-mongodb and comes with everything needed to connect to a MongoDB database.
To create a new Next.js app with the MongoDB integration built in, run the following command in the terminal:
npx create-next-app --example with-mongodb codecrush
The npx create-next-app command takes the --example with-mongodb parameter, which instructs the generator to initialize the app with the MongoDB integration example. codecrush is the project name — you can choose another. After installing the dependencies of npm, Yarn, or pnpm, enter the project directory:
cd codecrush
On some Node versions higher than 18, the download may fail with an error like this:
? Could not download "with-mongodb" because of a connectivity issue between your machine and GitHub.
✔ Could not download "with-mongodb" because of a connectivity issue between your machine and GitHub.
Do you want to use the default template instead? (Y/n)
The problem lies in node-tar extract(), which emits the close event. There is an open issue on GitHub about this. To work around it, use a Node version below 18 or type Y to download the default template:
Do you want to use the default template instead? (Y/n) Y
Then, install the dependencies and start the development server in the project directory:
npm install
npm run dev
Once the app is up, access localhost:3000. You will see an error — and this is expected. 😱
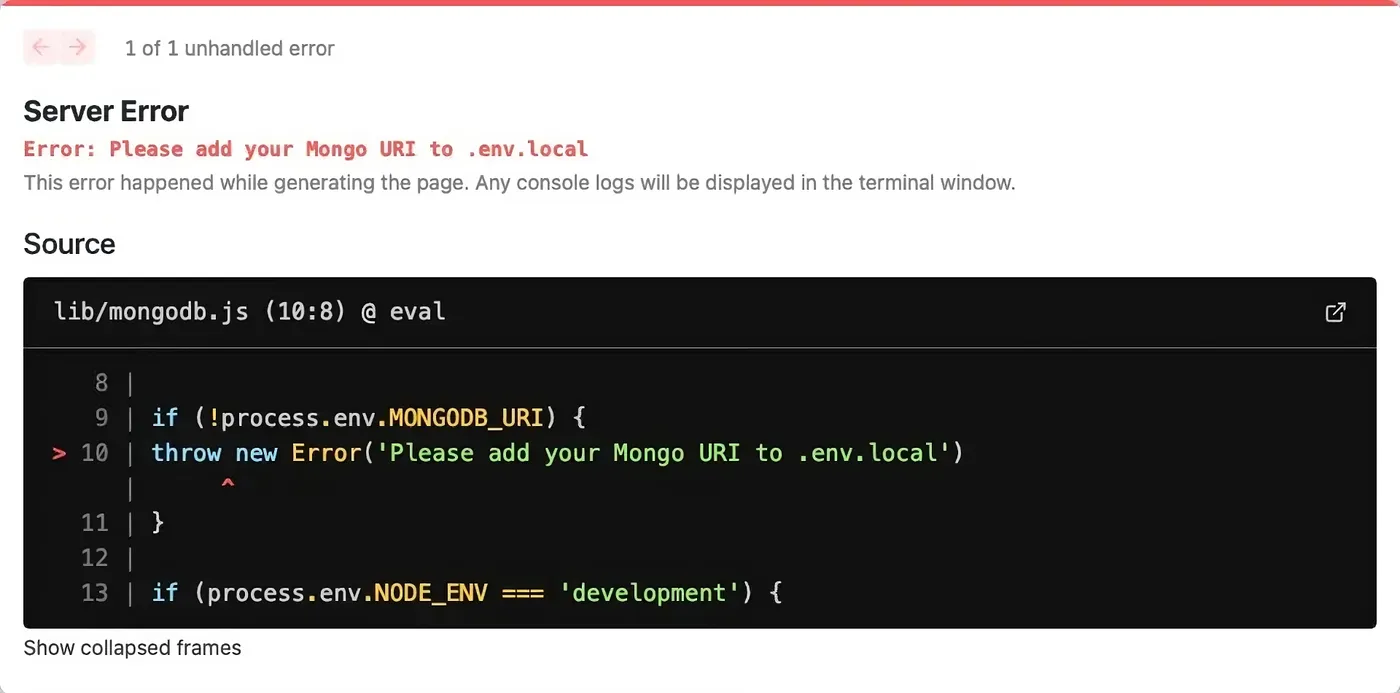
The good news is that the error is descriptive: it happens because we have not yet provided the MongoDB connection string to the Next.js app. We will fix this in the next section.
How to connect MongoDB to Next.js?
MongoDB connects to Next.js through the MONGODB_URI environment variable. In the project directory there is an env.local.example file: rename it to env.local and fill in the MONGODB_URI property with the connection string of your MongoDB Atlas cluster.
You can use a local MongoDB installation, but MongoDB Atlas is the quickest path to start without managing your own instance. The Atlas free M0 tier offers 512 MB of storage and up to 500 simultaneous connections, according to the MongoDB Atlas limits documentation — more than enough for this tutorial's sample data.
To get the URI (Uniform Resource Identifier), in the Atlas panel click Connect and then Connect to your application. The string will have this format:
mongodb+srv://<USERNAME>:<PASSWORD>@cluster0.vyllhkl.mongodb.net/<DBNAME>?retryWrites=true&w=majority
If you are new to Atlas, go to Database Access and create a user with a password, and to Network Access to ensure your IP is authorized. If you already have a user and network access, just replace <USERNAME> and <PASSWORD> with your credentials.
For <DBNAME>, load the Atlas sample datasets: under the chosen cluster, click the ... button and select Load Sample Dataset. Loading takes a few minutes and creates several databases. We will use sample_codecrush, so set <DBNAME> to that value.
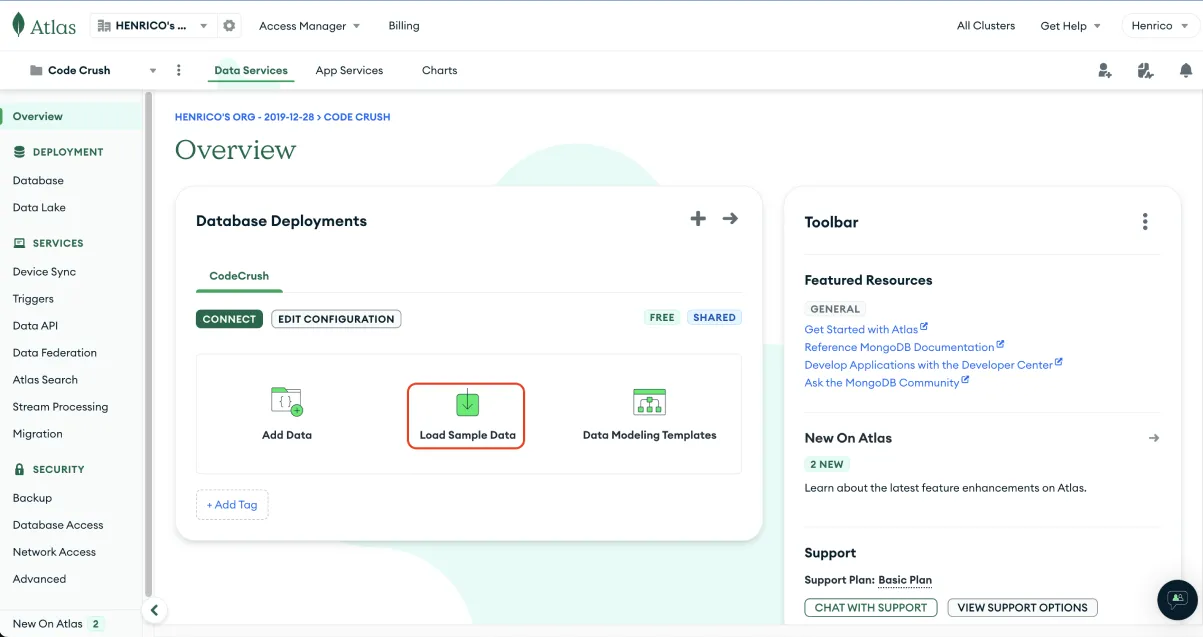
At the end, the env.local file should look like this:
MONGODB_URI=mongodb+srv://<USERNAME>:<PASSWORD>@codecrush.sdgqrsd.mongodb.net/?retryWrites=true&w=majority
Restart the application with npm run dev and access localhost:3000. If the message "You are connected to MongoDB" appears, everything is fine. If "You are NOT connected to MongoDB" appears, review the connection string, the database user, and the network access. In case of doubt, the MongoDB community forums usually have the solution.
How to query MongoDB data in Next.js?
Next.js offers several ways to fetch data from MongoDB once the connection is active. You can create API routes, run server-rendered functions with getServerSideProps for a specific page, or generate static pages with getStaticProps, fetching the data at build time.
Each approach serves a scenario: API routes expose a reusable endpoint, getServerSideProps renders on demand on every request, and getStaticProps pre-renders at build for maximum performance. Next, let's go to the most common example: the API route.
Practical example: Next.js API endpoint with MongoDB
An API (Application Programming Interface) route in Next.js is any file inside the pages/api directory. Each file becomes an individual endpoint. We will create the api directory inside pages and, in it, a languages.js file that returns a list of programming languages from the MongoDB database:
import clientPromise from "../../lib/mongodb";

export default async (req, res) => {
   try {
       const client = await clientPromise;
       const db = client.db("codecrush");

       const languages = await db
           .collection("languages")
           .find({})
           .sort({ year: -1 })
           .limit(10)
           .toArray();

       res.json(languages);
   } catch (e) {
       console.error(e);
   }
};
Starting with the import: we bring the clientPromise method from the lib/mongodb file, which contains the instructions to connect to the Atlas cluster. This file also keeps the connection instance cached, so subsequent requests reuse the existing connection instead of reconnecting to the cluster — all handled automatically for you.
The route handler has the signature export default async (req, res). If you have used Express.js, this will look familiar. This function runs when the localhost:3000/api/languages route is called: we capture the request via req and return the response via res.
The function calls clientPromise to get the database instance and runs a query with the MongoDB Node.js driver, returning the 10 most recent languages from the languages collection, sorted by year in descending order. Finally, res.json delivers the array in JSON format. When navigating to localhost:3000/api/languages, the result will look something like this:
[
  {
    "_id": "573a1394f29313caabcdfa3e",
    "name": "Dirt",
    "category": "Programming Language",
    "year": 2023,
    "creator": "John Doe",
    "description": "Dirt is a versatile programming language designed for rapid development and ease of use. It gained popularity for its simplicity and powerful features.",
    "website": "https://dirtlang.com"
  },
  {
    "_id": "573a1394f29313caabcdfa3f",
    "name": "Sparkle",
    "category": "Programming Language",
    "year": 2024,
    "creator": "Jane Smith",
    "description": "Sparkle is a high-performance language optimized for data processing and analysis. It offers seamless integration with distributed computing frameworks.",
    "website": "https://sparklelang.org"
  },
  {
    "_id": "573a1394f29313caabcdfa40",
    "name": "Glimmer",
    "category": "Programming Language",
    "year": 2022,
    "creator": "Maxwell Johnson",
    "description": "Glimmer is a modern language known for its elegant syntax and support for concurrency. It is suitable for building scalable and fault-tolerant systems.",
    "website": "https://glimmerlang.io"
  }
]
You can add new routes by creating more files in the api directory. As an exercise, how about creating a route that returns a single language from an ID provided by the user? Use the Next.js dynamic API routes to capture the ID.
Thus, when calling http://localhost:3000/api/language/573a1394f29313caabcdfa3e, the returned language should be Dirt. A tip: in the sample_codecrush database, the _id property is stored as an ObjectID, so you will need to convert the string to ObjectID before the query.
Sending the Next.js project to GitHub
With the project working, it is time to version it on GitHub. Follow these steps, starting each command in the terminal, inside the project directory:
- Initialize a local Git repository with
git init. - Add all files to the next commit with
git add .. - Commit the changes with a descriptive message:
git commit -m "First commit". - Connect the local repository to the remote:
git remote add origin repository_URL, replacingrepository_URLwith your GitHub repository address. - Push the commits to GitHub with
git push origin main. - Access the repository on GitHub and confirm the files were pushed.
If you have not yet created the repository, follow the official GitHub guide.
These are the basic steps to push the code when you already have Git configured on the machine and a GitHub account. Adapt them to your project's workflow.
How to deploy the project on Vercel?
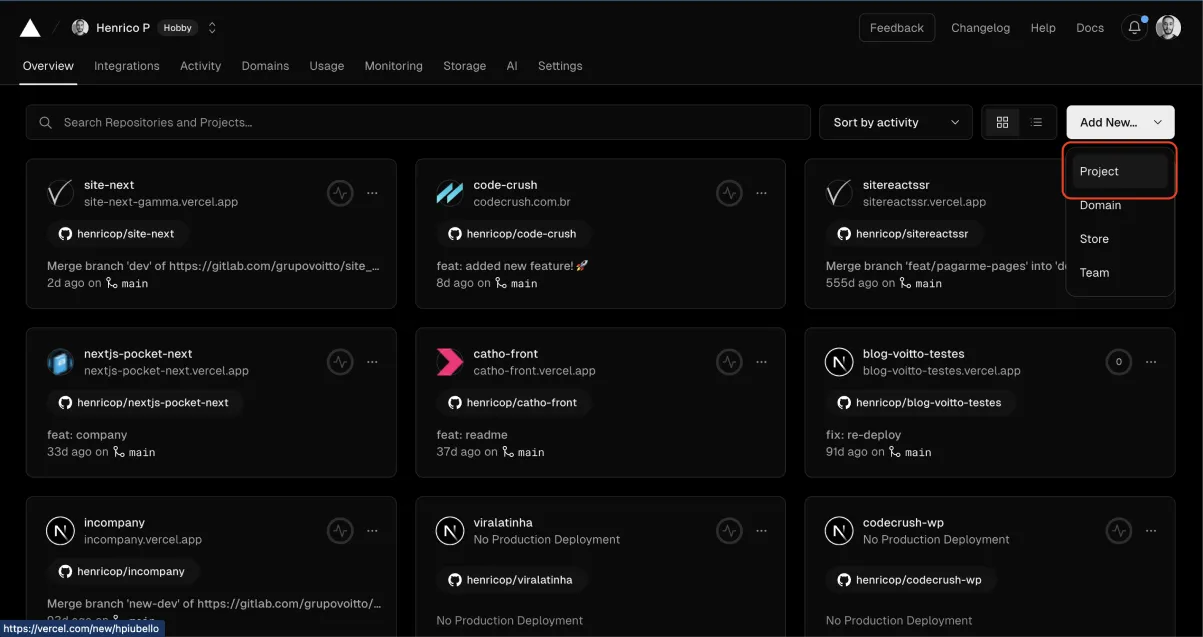
Deploying the Next.js project with MongoDB is done by importing the repository on Vercel. Access the Vercel dashboard, click Add New Project, and then Import Git Repository, choosing the repository you just pushed to GitHub.
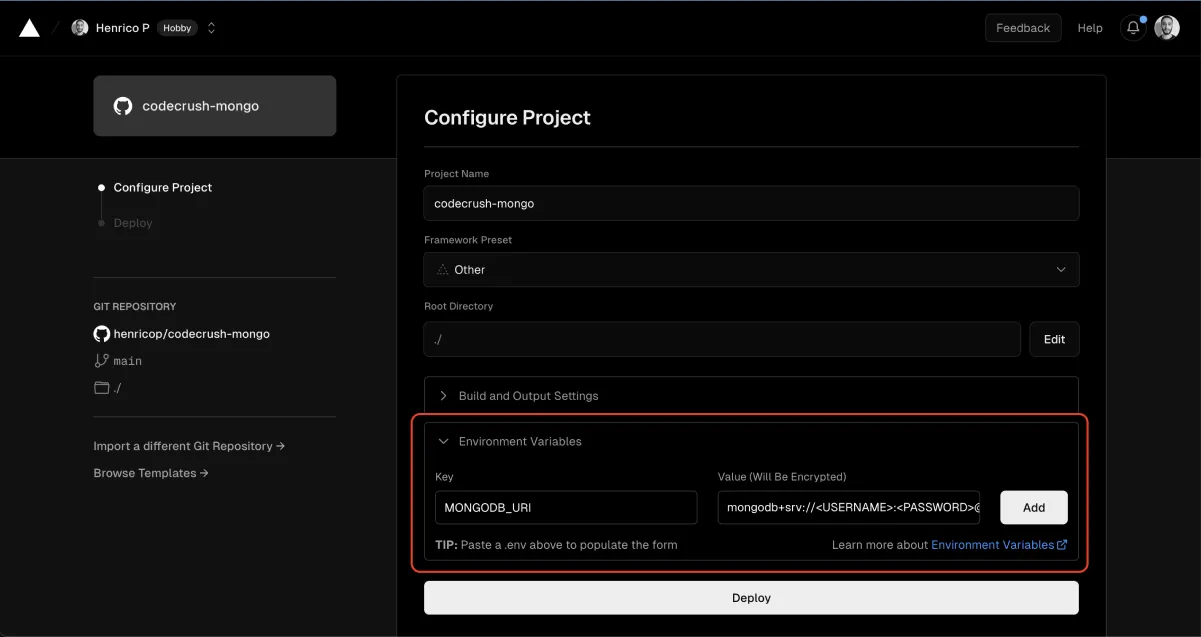
On the next screen, expand Environment Variables and add the MONGODB_URI variable with the value from your env.local file. Confirm the value before proceeding.
When you click Deploy, Vercel builds and publishes the application automatically. In a few minutes you receive a production URL. If you prefer a provider with control over the infrastructure, also see our guide on servers and the AWS universe.
🗒️ Note: Vercel uses dynamic IP addresses, so allow access from any IP in MongoDB Atlas. Go to Network Access, click Add IP Address, and choose Allow Access From Anywhere (or enter 0.0.0.0/0).
Next.js and MongoDB with one click
If you did not follow the step-by-step and want to quickly spin up a Next.js application with MongoDB, you can use the with-mongodb starter on GitHub. There is, however, an even more direct path.
This deploy link clones the official example and publishes it on Vercel — you only need to provide your connection string.
Conclusion
Integrating MongoDB and Next.js is surprisingly fast when you start from the official with-mongodb example: in a few minutes the app is connected, querying data through API routes, and deployed on Vercel. What makes this combination scale well in production is the cached connection in the lib/mongodb file — it prevents exhausting the cluster's connections in the serverless environment. Start with the free M0 cluster, validate your idea at no cost, and only migrate to a dedicated cluster when traffic justifies it. If you have questions, the MongoDB community forums are a great support point.
Recommended for this topic
Picked by the editors — only what we would use.
## faq
Frequently asked questions
Do I need to install MongoDB to use it with Next.js?
No. MongoDB Atlas offers a free M0 cluster in the cloud with 512 MB of storage, enough to learn and prototype. You just need to create an account, get the connection string (MONGODB_URI), and paste it into the env.local file of your Next.js project. A local installation is entirely optional.
Which driver does Next.js use to connect to MongoDB?
The official with-mongodb example uses the official MongoDB Node.js driver. It lives in the lib/mongodb file, which caches the connection to reuse it across requests. That way you avoid opening a new connection on every API call, which is essential in the Vercel serverless environment.
Should I use the Pages Router or the App Router with MongoDB?
Both work. This tutorial uses the Pages Router, stable and widely adopted in production. In the App Router (Next.js 13+), you query MongoDB directly in Server Components or Route Handlers, without getServerSideProps. The cached connection logic in the lib/mongodb file remains practically the same in both routers.
How to fix the connection error when running the project?
The most common error is the missing MONGODB_URI variable. Rename env.local.example to env.local and fill in the Atlas connection string. Also check whether the database user exists in Database Access and whether your IP is allowed in Network Access. Then restart with npm run dev.
MongoDB or MySQL: which to choose for a Next.js project?
It depends on the data model. MongoDB, document-oriented, shines with flexible data and schemas that change often. MySQL, relational, is ideal when you need strict transactions and well-defined relationships. For JavaScript APIs with semi-structured data, MongoDB usually accelerates development.
Topics in this article
## continue lendo
Artigos relacionados


Keep browsing
Previous article
Docker: What It Is, How It Works, and Essential Commands
Docker is the container platform that packages applications with their dependencies. See how it works, differences from VMs, and essential commands.
Read moreNext article

25 Quotes on Technology and Programming from Great Names
A collection of 25 quotes on technology and programming, from Steve Jobs to Grace Hopper, with author, context and the meaning of each quote.
Read moreAbout the author